AgentHuntzman's Leaderboard Ranking Vanguard Support Build
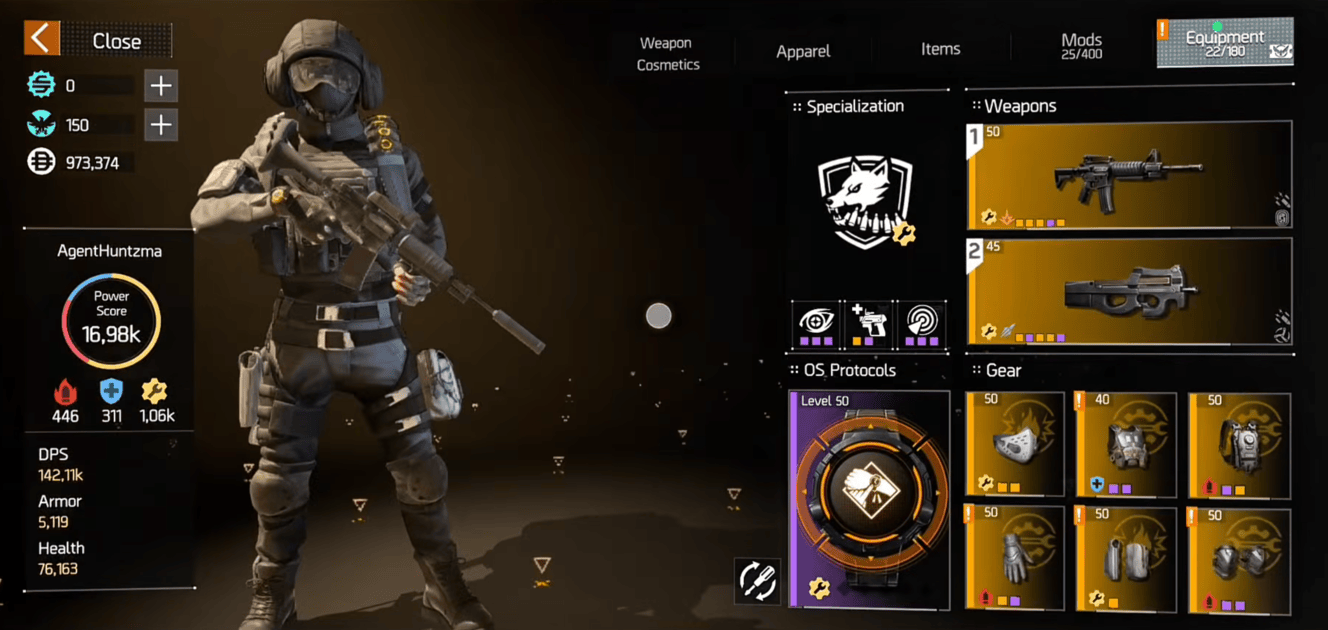
What This Build Does
Build credit: AgentHuntzman. Go watch his breakdown and drop a sub.
This is the Vanguard Recon Scout, a full team-support build that triples your squad’s damage output. You don’t kill things. You make your entire team kill things three times faster.
The loop is simple: stack Engineering through Torrential Downpour and Fully Charged, convert it into team-wide weapon damage through Tactical Smart Cover, debuff enemies with Scanning Pulse, and supercharge everyone’s rate of fire with Tactical Link. Your personal DPS will look embarrassing. Your team’s total output will be disgusting.
The Build
Gear
| Slot | Set | Talent | Core | Attribute Bonus 1 | Attribute Bonus 2 |
|---|---|---|---|---|---|
| Mask | Boom Shakalaka | - | Engineering | Skill Cooldown Recovery | Skill Duration |
| Chest | Mechanical Expert | Socialite | Engineering | Armor | Damage Reduction |
| Backpack | Mechanical Expert | Brainstorm | Engineering | Skill Duration | Skill Cooldown Recovery |
| Gloves | Mechanical Expert | - | Engineering | Skill Duration | Skill Cooldown Recovery |
| Holster | Boom Shakalaka | - | Engineering | Sig. Ability Charge Efficiency | Skill Duration |
| Kneepads | Mechanical Expert | - | Engineering | Skill Cooldown Recovery | Weapon Damage |
Loadout
| Slot | Item | Details |
|---|---|---|
| Primary | Police M4 (AR) | Torrential Downpour + Rapid Charge |
| Secondary | P90 (SMG) | Torrential Downpour + Fully Charged |
| OS Protocol | Pressing Matter | Skill CDR + Engineering + Skill Intensity (exact values vary by level and infusion) |
| Skill 1 | Tactical Smart Cover | Team weapon damage buff based on your Engineering |
| Skill 2 | Scanning Pulse | Applies Target Vulnerability and Exposed debuff to enemies hit |
| Signature | Tactical Link | Team-wide Rate of Fire, Damage Reduction, Movement Speed |
Skill Mods
| Skill | Mod | Effect |
|---|---|---|
| Tactical Smart Cover | Mobile Bastion | Kills/assists behind cover grant +10 Sig. Ability charge to the whole team |
| Scanning Pulse | Scout (C-Chip) | Each pulse grants +8 Sig. Ability charge to the allied team |
| Tactical Link | Bugle Call | Deploying Link grants Rate of Fire, Damage Reduction, and Movement Speed buffs to the team (exact values vary by rank) |
Alternatives worth knowing:
- Smart Cover: Hardened Casing (+12% Armor to covered allies) if your team is dying before they can deal damage
- Scanning Pulse: Exposing Burst (increases Exposed stack damage) for harder PvE content with tankier enemies
Why Each Piece Matters
Engineering on Every Piece
AgentHuntzman’s video shows mixed cores (Toughness on chest, Firepower on backpack/gloves/kneepads). We recommend Engineering on every piece. More Engineering = more Smart Cover weapon damage for the whole team. That’s the entire point of the build.
Mechanical Expert 4-Piece
The 2pc (+9.6% Skill Duration) and 3pc (-9.0% CDR) keep your skills cycling with near-permanent uptime. The 4pc boosts SAC Efficiency, meaning your Tactical Link charges faster from all sources. Exact set bonus values are build-specific and depend on gear level — treat any percentages here as approximate.
Boom-Shakalaka 2-Piece
The 2pc (-6.0% CDR) stacks with Mechanical Expert’s 3pc for even faster skill cycling. You only slot 2 pieces, so the 3pc and 4pc bonuses are not active.
Chest: Socialite (And Real Alternatives)
“Grants +10% Movement Speed when there are no enemies within 20m. Grants +36% Armor while within 20m of an enemy.”
You’re sitting in your Smart Cover while enemies push toward you, and it rewards that with a massive armor boost at the moment of contact. Solid pick, and AgentHuntzman’s choice.
Attribute bonuses on the chest: Roll Armor and Damage Reduction here, not Duration or CDR. The chest is the one survivability slot in the build. Socialite’s +36% Armor scales directly off your Armor stat, so more Armor in your bonus slots means a bigger shield when enemies close range. Damage Reduction stacks on top. The rest of your gear handles uptime. The chest handles keeping you alive long enough to use it.
But the chest slot has genuine competitors that are worth knowing:
Deep Focus: “Grants +28% Skill Duration but inflicts -10% Skill Radius.”
This might actually be the better pick for this build. +28% Skill Duration directly extends your Smart Cover uptime and your Scanning Pulse vulnerability window. The -10% Skill Radius penalty sounds scary but does nothing meaningful here: based on current testing, Skill Radius provides minimal benefit to this build — your Smart Cover is placed on a specific piece of cover and your Scanning Pulse already fills a room at base range. If you care more about uptime than staying alive, Deep Focus is worth testing over Socialite.
Accelerated Charge: “Kills and assists behind cover grant +30% Signature Ability Charge Efficiency for 8 seconds.”
More Tactical Link uptime. If your team is getting kills consistently behind your cover (and they will be, because you’ve tripled their damage), this procs constantly and stacks on top of your existing SAC build. Worth running if Tactical Link uptime is your priority over raw armor.
Nothing to Lose: “Taking damage has a 50% chance of reducing Skill Cooldowns of deployed Skills by 2%, up to 3 stacks.”
Situationally useful if you’re getting pressured, but it requires you to be taking hits to proc. Doesn’t fit the play pattern of sitting safely in cover.
We haven’t tested these head-to-head yet. If you run Deep Focus or Accelerated Charge and have results, drop them in Discord. This section will get updated.
Backpack: Brainstorm (Our Recommendation)
“Grants +15% Skill Duration. Grants an additional +15% Skill Duration when within 20 meters of an ally.”
AgentHuntzman runs Intense Performance II (+46% Skill Radius) on his backpack. We recommend Brainstorm instead. Based on current testing, Skill Radius provides minimal benefit to this build compared to Duration or CDR. Your Smart Cover is placed on a specific piece of cover, and your Scanning Pulse already covers a room at base radius. Stacking more radius to cover empty space behind you is wasted budget.
Brainstorm gives +30% Skill Duration at all times (you are always near teammates). Smart Cover stays up 30% longer. Scanning Pulse vulnerability lasts 30% longer. Every second of extra uptime is a second your team is doing amplified damage. Duration is king.
A Note on Skill Intensity
You’ll notice we’ve swapped most Skill Intensity rolls for Skill Duration, Sig. Ability Charge Efficiency, Damage Reduction, and Skill Cooldown Recovery. Skill Intensity sounds good on paper but its actual impact on this build is not well documented. The community assumption is that it increases the weapon damage Smart Cover transmits to allies, but exact scaling hasn’t been confirmed by testing. Until there are hard numbers, the stats with known impact win. If you test it and get real results, share them in Discord.
Skill Duration vs. CDR: Does More CDR Actually Help?
Short answer: at this gear setup, probably not. Here’s why.
Scanning Pulse: In testing, duration runs roughly 17 seconds and cooldown roughly 15 seconds with this gear setup. Duration already beats cooldown with no additional CDR investment. That means you can reapply the debuff before it ever expires. CDR reduces the gap between your recast and the next window, but since there is no gap, stacking more CDR gives you nothing extra on Pulse.
Tactical Smart Cover: In testing, duration runs roughly 25 seconds and cooldown roughly 22 seconds with set bonuses applied. Same story. Duration wins. Your cover isn’t dropping before you can recast it.
Our gut call: the CDR you get from Mechanical Expert 3pc + Boom Shakalaka 2pc + Pressing Matter is already enough. It’s baked into the build. Every additional CDR roll you chase after that is wasted. You’re buying a faster recast window for a skill that’s still active. Stack Skill Duration instead. Longer buffs mean your team is inside a vulnerability window or behind an amplified cover longer per fight. That compounds.
The one exception: if your rotations feel ragged in practice and Smart Cover is actually going down mid-fight, check your CDR rolls before anything else. But if the build is geared correctly, this shouldn’t happen.
Weapons Deep Dive
All weapons below assume a tactical mod is equipped. SMG tactical mod reduces reload time by roughly 45% (community-tested). AR tactical mod improves stability and reduces recoil. These are not optional. Equip them.
Primary: Police M4 (AR)
- Torrential Downpour: Hitting enemies 10 times within 5 seconds grants +22.5% Engineering for 12 seconds. This is your Engineering injection.
- Rapid Charge: Hitting an enemy 5 times in 3 seconds grants +50 Signature Ability charge. This is how you get Tactical Link back fast.
- RPM: 850. Magazine: 30. This is your proc weapon, not your sustained fire weapon. Land your hits, swap to P90.
- Ideal attributes: Weapon Blast Damage + Weapon Damage.
- Torrential Downpour and Rapid Charge can be recalibrated between compatible AR platforms. Whether a specific AR can accept a specific talent depends on its talent pool. Verify in-game before committing a recal.
Secondary: P90 (SMG)
- Torrential Downpour: Same talent, second copy. Different cooldown timer from the primary.
- Fully Charged: Reloading an empty magazine grants +7.50% Engineering for 12 seconds, stacking up to 3 times (+22.50% total). This is the talent that makes the build tick.
- RPM: 900. Magazine: 50. Reload: 2.47s base. With the SMG tactical mod, that reload gets significantly faster. You burn through the magazine in about 3.3 seconds. Every empty reload is a Fully Charged proc, and with the mod equipped the cycle feels near-continuous.
- Ideal attributes: Weapon Piercing Damage + Weapon Damage.
Why P90 Specifically
This build needs BOTH Torrential Downpour and Fully Charged on the same weapon. You only need one to drop naturally, then recalibrate the other onto it. The P90 at 900 RPM is the fastest SMG that can roll both talent slots, which is why AgentHuntzman picked it. Based on community reports, the AUG A3 Para XS also qualifies. The Vector can’t roll Fully Charged. The MP7 can’t roll Torrential Downpour. If the talent pool has shifted since this was written, verify before you recal.
Specialization Focus Upgrades
These are unlocked through the Recon specialization tree and are critical to the build.
| Upgrade | Level | Effect |
|---|---|---|
| Exposed | 3/3 | Inflicts +10% incoming damage on scanned enemies, deals damage equal to 4% Engineering for 30 seconds, up to 3 stacks. |
| Foxhole | 3/3 | Hiding behind Smart Cover grants Fortified to you and all allies. Weapon hits grant extra health equal to 450% of Engineering for 3 seconds. |
| Entrenched | 3/3 | Grants +4% Damage Reduction to Fortified allies. |
| Target Rich Environment | 3/3 | While using Tactical Link, each enemy within 20m grants +12% Accuracy, Stability, and Reload Speed for 10 seconds, up to 3 stacks (+36% max). |
| Friendly Hand | 2/2 | Grants +10% Damage Reduction for 10 seconds to pulsed allies. |
| Combat Inspiration | 2/2 | Grants +5% Engineering for 10 seconds when an Exposed enemy dies within 30 meters, up to 3 stacks (+15% Engineering). |
Foxhole is the sleeper here. The higher your Engineering, the more extra health every teammate gets per weapon hit while behind your Smart Cover. Your teammates become borderline unkillable. This is why the build dominates Legendary missions.
Smart Cover: What the Description Doesn’t Tell You
Tactical Smart Cover converts a percentage of your Engineering into Weapon Damage for every agent behind cover (approximately 24% based on community testing). The higher your Engineering, the bigger that bonus.
What it doesn’t say upfront: the Foxhole specialization node (3/3) grants Fortified to every ally behind your cover. While Fortified, every weapon hit restores health scaled to your Engineering for 3 seconds. On a full Engineering build, that’s a meaningful passive health restore per shot. Your teammates hit harder and stay alive doing it. This is why the build holds up in Legendary content. The cover is doing two jobs at once.
How the Skills Work Together
Tactical Smart Cover converts a portion of your Engineering into Weapon Damage for every agent behind the cover (approximately 24% based on community testing). The higher your Engineering, the bigger the weapon damage bonus your whole team gets.
Scanning Pulse applies Target Vulnerability and Exposed stacks to enemies. In testing with this gear setup, duration runs roughly 17 seconds with cooldown around 15 seconds, giving near-permanent uptime. Every enemy your Pulse touches takes significantly more damage from your entire team.
Tactical Link (Bugle Call) buffs the team with increased Rate of Fire, Damage Reduction, and Movement Speed (exact values vary by mod rank — approximate figures from community testing suggest roughly 14% RoF, with DR and Movement Speed buffs on top). Duration runs approximately 22 seconds in this setup. Every shot fires faster. Every shot hits enemies who are already debuffed. Every shot is boosted by Smart Cover. Plus Target Rich Environment grants Accuracy, Stability, and Reload Speed during Link.
The team’s DPS doesn’t just go up. It multiplies across three separate buff stages.
Team DPS: Before and After
These are estimates based on each buff’s stated value compounding in sequence, not controlled test results. Treat them as a framework for understanding how the buffs layer, not hard numbers.
Baseline (no support buffs): 100%
After Smart Cover (Engineering conversion to Weapon Damage): significant team damage increase
After Scanning Pulse (Target Vulnerability, multiplicative): compounds further
After Exposed stacks (increased incoming damage, stacks up to 3): compounds further
After Tactical Link Bugle Call (Rate of Fire buff, more shots per second): compounds further
After Combat Inspiration (+15% Engineering feeding back into Smart Cover): small additional multiplier
These stack multiplicatively, not additively. The actual output depends on your Engineering total and how many buffs are active at once. If you run it and track real numbers, share them.
This Gear on Other Specializations
The gear set (Mechanical Expert 4pc + Boom Shakalaka 2pc) is not Vanguard-locked. If you have the pieces, you can run it on another specialization and keep the set bonuses. What you lose is everything in the Vanguard Recon tree: Foxhole, Exposed, Friendly Hand, Combat Inspiration, Target Rich Environment. All of that is Recon-specific.
On Aegis or Tech Operator with this gear, Smart Cover still transmits weapon damage and the set CDR still applies. You just don’t have the passive health restore from Foxhole, the Exposed damage stacks, or the Sig charge generation from the Scout subclass. The build functions. It’s less effective.
Run it on Vanguard Recon when your team coordinates around the cover. If your team scatters, the multipliers don’t land and you’d get more value from a build that works independently.
Loot Quick-Reference
| Drop | Must Have |
|---|---|
| Boom Shakalaka mask/holster | Engineering core + Skill CDR or Skill Duration |
| Mechanical Expert chest | Engineering core + Socialite talent |
| Mechanical Expert backpack | Engineering core + Brainstorm talent |
| Mechanical Expert gloves/kneepads | Engineering core + Skill CDR or Skill Duration |
| Police M4 | Torrential Downpour + Rapid Charge |
| P90 | Torrential Downpour + Fully Charged |
| Pressing Matter OS Protocol | Always keep |
Frequently Asked Questions
Why does my DPS look terrible on this build?
Because you're reading the wrong number, champ. Your stats show YOUR damage. It does not show the Weapon Damage you're pumping into every teammate through Smart Cover, the +20% vulnerability from Scanning Pulse, or the rate-of-fire buff from Tactical Link. Your team's total DPS is tripling. Yours just isn't the one doing it. Think of yourself as the guy who brought the aux cord to the party. Nobody thanks the DJ, but the party dies without him.
Can I run this build solo?
You can also eat soup with a fork. Technically possible, practically miserable. This build is designed to multiply other people's damage. If there are no other people, you are multiplying zero. For solo content, run a Vanguard Commando DPS build instead and come back to Scout when you have friends. Or matchmake. We don't judge.
Is the P90 actually better than an LMG for this build?
For this build, absolutely. The P90 fires at 900 RPM, which means you burn through magazines fast and trigger Fully Charged (+7.50% Engineering) on every empty reload. An LMG with a 100-round belt takes forever to empty, so you're waiting ages between Engineering stacks. But here's the real reason: the build needs BOTH Torrential Downpour and Fully Charged on the same weapon. Only two SMGs in the entire game can roll both talents: the P90 and the AUG A3 Para XS. The Vector fires at 1200 RPM but can't roll Fully Charged. The MP7 fires at 950 RPM but can't roll Torrential Downpour. The P90 is the fastest SMG that actually qualifies for both slots. AgentHuntzman didn't pick it randomly.
What's the best Vanguard support build in Division Resurgence?
You're looking at it. The Vanguard Scout Recon running 4pc Mechanical Expert + 2pc Boom Shakalaka is currently the highest-impact support build in the game. AgentHuntzman runs this and triples team DPS.
Do I need Legendary drops for this build?
Nope. That's the beautiful part. This build already dramatically multiplies your team's damage output. Stop waiting for perfect drops and start running the build. Your squad will thank you immediately.
Why Mechanical Expert over Long-Term Effect?
Mechanical Expert is the correct choice because the 2pc Skill Duration and 3pc CDR keep your Smart Cover and Scanning Pulse cycling with near-permanent uptime. The 4pc SAC Efficiency bonus means your Tactical Link charges faster. You need permanent skill uptime before you need bigger numbers. A buff that's down for 5 seconds between casts is doing zero damage during those 5 seconds, no matter how large the number is.
The Silent Carry Build
Your DPS looks mid. Your team's DPS triples. The Vanguard Scout is the most impactful build in Resurgence and nobody is talking about it.
Comments
Join the discussion — powered by GitHub Discussions. No tracking, no ads.